
Monotub Starter Kit: How to grow magic mushrooms

A monotub provides a simple, self-contained environment for growing magic mushrooms from colonized grain spawn and bulk substrate. Our Monotub Starter Kit includes the main components you need to prepare the tub, colonize the substrate, and produce multiple flushes of mushrooms.
In this guide, we’ll take you through the entire process step by step, from breaking up the grain spawn and preparing the substrate to harvesting your mushrooms and preparing the tub for the next flush.
Table of Contents
Before you start
Once you open the bags of colonized grain spawn and bulk substrate, cleanliness becomes especially important. Preparing your workspace beforehand helps reduce the risk of unwanted microorganisms entering the tub.
Choose a clean room with enough workspace to comfortably prepare the entire tub. Make sure you have enough clear space around the tub, as the base will be filled with substrate all the way to the rim during preparation. Avoid areas with strong air movement from open windows, fans or ventilation systems, as this can increase the risk of contamination.
Clean your work surface and wash your hands thoroughly before you begin. For additional protection, you can wear clean nitrile gloves and a face mask. If you use gloves, disinfect them before handling anything that will come into contact with the substrate.
Have all your equipment ready before opening the bags so you can complete the preparation without unnecessary interruptions.
What's included in the Monotub Starter Kit
The Monotub Starter Kit includes:
- A monotub with sponge filter plugs
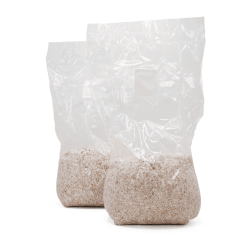
- A bag of colonized grain spawn (3 litres)
- Prepared and optimized CVG bulk substrate (5 litres)

Optional supplies
The following supplies aren’t strictly required, but can make preparation easier and help you maintain a clean working environment:
- Nitrile gloves
- Face mask
- Surface and/or hand disinfectant
- Fine-mist spray bottle
- Clean spoon for mixing the grain spawn and bulk substrate
How to use your Monotub Starter Kit
Follow the steps below to prepare your monotub and mix the grain spawn with the bulk substrate. Work carefully and keep your workspace, hands, and tools as clean as possible throughout the process.
Step 1 — Break up the grain spawn
Before opening the grain spawn bag, break up the colonized grain into individual kernels as much as possible.
Gently massage the sealed bag with your hands until the larger clumps have broken apart. There’s no need to use excessive force. The goal is simply to loosen the spawn so it can be evenly distributed throughout the bulk substrate.
Keep the bag completely sealed while breaking up the grain spawn.

Step 2 — Put on gloves and a face mask (optional)
If you’re using nitrile gloves and a face mask, put them on now.
We recommend wearing them while preparing the tub, as they provide an additional barrier between you and the exposed substrate. Disinfect your gloves before continuing.
Step 3 — Disinfect the monotub
Thoroughly clean and disinfect the inside of the tub base and cover using a suitable surface disinfectant.
Allow the surfaces to air-dry for a few minutes before adding the substrate. Avoid wiping them dry with a cloth or towel, as this could reintroduce contaminants.
Your monotub is now ready to be filled.

Step 4 — Prepare the bulk substrate
Cut open one corner of the CVG substrate bag.
Open the bag slightly to let some air in, then gently massage the substrate to loosen it. Break apart any large, compacted pieces until the substrate has a loose, even consistency.

Step 5 — Add the CVG and grain spawn
Add approximately four-fifths of the bulk substrate to the tub. Next, open the grain spawn bag and add all of the colonized grain on top.
Using a clean, disinfected spoon, thoroughly mix the grain spawn and substrate together. Pay particular attention to the corners and edges of the tub to make sure everything is evenly mixed.
Try to distribute the colonized grain as evenly as possible throughout the substrate. This gives the mycelium plenty of points from which to start colonizing the bulk substrate.
Once everything is thoroughly mixed, gently level the surface without compacting the substrate too much.


Step 6 — Add the remaining substrate
Spread the remaining one-fifth of the bulk substrate evenly across the surface. This creates a thin top layer that covers any exposed grains and helps maintain moisture at the surface.
After applying the top layer, use a fine-mist spray bottle to evenly moisten the surface. The surface should be moist, but not waterlogged or covered with large pools of standing water.

Step 7 — Close the monotub
Place the cover onto the tub base.
Insert the supplied sponge filters into the ventilation holes. These openings allow passive gas exchange, while the filters help protect the inside of the tub from the surrounding environment.
Move the tub carefully after filling it to keep the substrate surface as level as possible.


Step 8 — Allow the substrate to colonize
Place the monotub in a clean location and allow the mycelium to colonize the substrate at 21–26 °C. Warmer temperatures within this range generally result in faster colonization.
Avoid placing the tub close to houseplants, open windows, frequently opened exterior doors, or other potential sources of contamination.
Over time, you’ll see white mycelium spreading from the colonized grain into the surrounding bulk substrate. As colonization progresses, more and more of the substrate will become covered with mycelium.
Try to avoid opening the tub unnecessarily during this period.
Keep an eye on the surface moisture as colonization progresses. Some drying may occur, particularly around the ventilation holes. If the surface begins to dry, lightly mist the affected area with a fine-mist spray bottle from about 30 cm above the substrate.
Avoid spraying a concentrated stream of water directly onto the developing mycelium.


Fruiting conditions
Once the substrate is fully colonized, the mycelium can begin producing magic mushrooms when provided with suitable fruiting conditions. During fruiting, aim for an ambient temperature of around 21–26 °C.
Step 9 — Harvest your magic mushrooms
Your magic mushrooms will usually be ready to harvest 14–28 days after mixing the grain spawn with the CVG substrate. The exact timing can vary depending on the ambient temperature and growing conditions.
It’s best to harvest the mushrooms when they are mature, but before they start dropping spores. The ideal moment can vary slightly between strains, as some tend to release their spores earlier than others.
When harvesting, try to avoid damaging the substrate as much as possible. For more detailed instructions, check out our article on how to harvest magic mushrooms.
The pictures below show the results of our example grow. The substrate was colonized at 26 °C, followed by fruiting at 23–26 °C.
You may notice that some of the larger mushrooms start lifting the tub cover as they mature. This is perfectly fine. The small gap simply allows more fresh air to enter the tub, which is beneficial at this stage.


Step 10 — Prepare the substrate for the next flush
After harvesting, rehydrate the substrate by pouring 500–700 ml of clean water into the gap between the substrate and the base of the tub. Then thoroughly mist the surface with a fine-mist spray bottle, spraying from a short distance above the substrate.
Replace the cover and allow the substrate to recover and begin producing its next flush. If you notice any water pooling on the surface the following day, carefully tilt the tub to drain off the excess water.
Repeat this rehydration process after each harvest to encourage additional flushes, until the mycelium stops producing new mushrooms.


Dry and store your magic mushrooms
Once your monotub is set up for the next flush, you can decide what to do with your harvest. Fresh mushrooms can be used directly, but proper drying is essential if you want to store them for a longer period. Removing as much moisture as possible helps preserve their quality and prevents them from spoiling during storage.
For detailed instructions on drying methods, storage conditions, and how to keep dried mushrooms in good condition, read our complete guide to drying and storing magic mushrooms.
Monotub Starter Kit: final tips
Cleanliness, stable environmental conditions, and patience are some of the most important factors in mushroom cultivation.
Avoid repeatedly opening or adjusting the tub just to check on its progress. Observe the grow through the transparent walls whenever possible and only intervene when necessary.
Once you become familiar with what healthy mycelium and proper surface moisture look like, maintaining the tub becomes much easier. Each grow will also give you a better understanding of how your particular environment affects colonization, moisture, and fruiting.
We hope this guide helps you get the most out of your Monotub Starter Kit. Good luck with your grow, and enjoy the process!